

North American Ariel Builder's Club
"I just completed a pair of Ariels and would like to contribute in a small way to the work that Lynn has so generously shared with us. I have some comments that may be useful to potential Ariel builders.
Sound
Wow! These are great sounding speakers. I was somewhat worried about the limited bass output from such small woofers. To my surprise these speakers do not sound lean. And although the bass is not real deep the quality more than makes up for it. No subwoofer for me, thank you. However, I must admit that my preference has always been toward lean, tight bass. As for the the other aspects of the sound, great clarity and detail without harshness. Very natural sounding.
The North Creek Kit
I purchased the Ariel kit from North Creek. The kit was more expensive than I had anticipated ($649) but the quality of their components was most impressive. The caps and inductors are all matched to 1% and they even hand match the 1% ohmite resistors. The crossover plans use some excellent techniques. I would suggest getting a copy their wiring guide ($5.00) even if you don't buy the kit.
From Lynn: Actually, this is one of the areas where I disagree just a little bit with North Creek. I favor all-soldered connections, without the ring-tongues used by NCMS. I also prefer to get the inductors further apart than the NCMS layout guide - of course, this makes for a bulkier crossover. I agree completely with their cabinet-building techniques, and I freely admit I swiped the idea of an outer shell of MDF with an inner structure of plywood from NCMS.
The kit also includes materials for a panel dampening compound that they call "glop". This stuff is great. An ear to the side of the cabinets showed that the areas treated with glop are very dead.
The kit was complete with everything you need except for the wood (screws, stuffing, wire, etc.). The only thing other than wood that I had to buy was the hardware for attaching the base. I think that the kit is a good value and highly recommend it. The parts quality is top notch and it is a very convenient way to assemble all of the parts. If the cost is a problem, they will soon be providing a "budget" version of the kit with less exotic crossover parts.
Construction
These are difficult cabinets to build! Even with fairly good equipment I had trouble with inaccurate cuts and had to do a lot of re-work. I built the cabinets with walnut over MDF and used solid walnut on all corners. With a wood veneer everything is a lot less forgiving. A painted cabinet would probably be considerably less difficult to build
I figured out a way to make the large radii with a table saw. You make a series of cuts with the saw blade angled at 4 degree increments. Start with the blade set at 4 degrees, then 8, 12, 16 and so on. For each setting run the panel through and then rotate 90 degrees and run it through again. This results in a total of 41 angled cuts that with a little sanding makes a nice rounded corner.
The secret to this method is being able to make very accurate settings for the fence. As you can imagine each of these cuts removes only a small amount of material and very small errors will be a problem. To get sufficiently accurate adjustments with my table saw fence I made a jig that clamps to the table surface and has a set-screw against the fence. This made it easy to make very small and accurate adjustments. To make the adjustments you will need to find objects that are 1-1/2 and 3 inches in diameter. Just place the correct diameter object against the fence and adjust the fence so that the blade just touches the object. It took me about 2 hours to put the radiuses on my cabinets.
Grill covers have always been a bit of a compromise so with the Ariels I decided to just dispense with them. Fortunately the Ariel drivers are fairly attractive and don't look bad without grill covers. Even my wife likes the way they look with out covers. However, without grill covers the circular recesses for the drivers need to fit exactly. I made a circle cutter base for my router to make the recesses. A circle cutter is fairly simple to make. It's just a piece of 1/4 inch plywood with a slot and an adjustable pin (bolt).
Tweaks
I tried removing the tweeter chamber as mentioned in the Tweaks & Bug-fixes section of the Ariel web page and noted some improvement in the midrange. Removing the chamber was indeed a pain. I found that using a pair of wire cutters to peel off the rim first made it easier. The change was subtle but certainly worth the effort.
I also constructed the Ariels with the top section and a small portion of the front baffle filled with sand. I was able to listen to the speakers before and after this tweak. Contrary to my expectations the improvement was very small. Subtle enough that I am not sure it really helped. Since this is a simple tweak it is probably worth the effort anyway.
Amplification
I am currently driving my Ariels with a highly modified Hafler 220 (regulated power supplies, good wire, caps, resistors and such) and they sound great. However, I have a feeling that a tube amp would do better. I would be interested in hearing from others about their experiences with matching the Ariels with an amp."
Chris Brady is known as cbrady at the cray dot com site.
"It started out as a woodworking project. It became a complete change for my audio system and listening habits. I had built a pair of Ariels and just finished up a pair of ME2's for comparison. When I first finished the Ariels I tried them with my original solid state equipment. They sounded quite nice and I started thinking about trying some other equipment. I borrowed a Jolida SJ502a integrated tube amp on a whim (I never ran tubes before) and POW! I have since added a Rotel CD player and a Assemblage DAC 2.0. I believe that this is one of the best sounding 'affordable' systems I have heard. One listen to John Lee Hooker's 'Chill Out' CD and I can't get people out of my favorite listening chair! Great design and excellent plans.
P.S. The bass these speakers provide is so clean and tight it amazes!"
Best regards,
Bob Wilde"Hi Lynn, thanks for the reply. After a long weekend of listening to some new CD's, I am still amazed by the pure enjoyment and lack of listener fatigue your speaker design offers. You can use my letter on the club page.
I am going to start trying some other amps on my system in the coming months (it's too damn cold to be outside!) and am looking forward to seeing what happens."
Best regards,
Bob WildeBob Wilde is known as bwilde at the aa-inc.com Website.
"I live in Corvallis, OR. My father and I built a beautiful pair of Ariels. We're working on a pair of Reicherts right now to drive them. I can understand people's apprehension about putting down all the cash required to build a pair of these babies, I was there once myself. In fact, I was pretty nervous during the whole building process. After spending about a thousand dollars on parts, (hey, I'm a college student, I had to build them on a budget) what if I hooked them up and they sucked? Well, it took all of about 30 seconds of listening to them to realize that 1000 dollars and four months of work had much more than paid off. Now my Dad wants to build another pair for his house."
David Krause is known as kraused at the ucs dot orst dot edu site.
"I think this is a great idea, please include my name to the list. I am building a S.E.X. kit amp (from VALVE magazine) to drive my ariels and hope this will be a good match. The 'version' of the speaker I like the best is before you attach the front panel and can see all the interior guts - it's not the same after you cover up all the hard work."
Sam I Matoba is known as simatoba at the ucdavis dot ucdavis dot edu site.
"I finally succeeded in finding someone that had enough knowledge to put the Ariels together for me. They sound marvelous. Thanks for publishing your kit so that others may enjoy the beautiful sound that they produce. The bass is surprisingly deep and the mids are superb. Several "bass freak" friends of mine went away with a great appreciation of just how important midrange is after hearing them. One even wants a pair of Ariels for himself. It's too bad that most audiophiles don't get to hear sound like the Ariels produce (especially in Idaho!!)
Thanks again for the wonderful music."
About 2 months later I received a second letter from Todd ...
"Two more friends heard the Ariels last night. They BOTH want a pair. I came in to download the design plans and I didn't know there was an Ariel club. Good idea.
The Ariels make it difficult to sell the other speakers I have around here!!! Everyone wants to hear the Ariels when they see them, then when they hear them, they want to buy them... Oh well, the price we pay for owning truly great sound."
Thanks, Todd
Todd S. England is known as tengland at the cyberhighway dot net site.
"Lynn, muchos kudos on your writings in PF and for the wonderful living document that the Ariel page has become. I placed my first order for Ariel parts today, and will fill out the goodies as time passes. I plan on documenting the building process with lots of detail, in order to make a web page. Dunno when it will get done, and nor do I think it will be the be-all-end-all of resources on your speakers. Just my addition to the Ariel builders club.
To address your query about removing the rear chamber on the tweeter, try this:
Take a hacksaw and cut a notch in the plastic just behind the magnet. Then pry it (the chamber, not the saw) from the assembly with a large flat blade screwdriver. I have not done this with the Scan tweets, but have had very good luck with the silk dome Vifas (D27tg-35's and D27tg-45's). Give it a whirl if you have the inclination."
Again, many thanks,
Jim Tiemann
Techo-shaman in trainingJim Tiemann is known as tiemann at the mscd dot edu site.
"I just want to say that I finally graduated! From the Ariel builders club to the Ariel listeners club. I've been listening to the Ariels for about two weeks, and I really enjoy their sound. As best as I can describe, what I hear from the Ariels is a very well balanced sound; with a great midrange, smooth highs, and bass that, to me, is very musical. The bass is not "TOP GUN" home theater-type bass, but this speaker can surprise you at times with the amount bass it can produce. To end this paragraph, I will say that these speakers deserve a better description than I just wrote!
The equipment that I use with the Ariels is as follows:
Tube Amp: EAR 859 SE tube
Solid state: Douglas Self class B bipolar
CD player: Stan Warren Teac PD-1200 or modified Magnavox CDB 650
Tuner: Lux T-117The EAR 859 and the Teac PD-1200 is what I use most of the time, but the Ariels do well with some solid state amps as well. My brother-in-law, Dan Shneider, currently drives his Ariels with a stock Hafler preamp and a B & K Mosfet amp with excellent results.
It has been fun sharing ideas and building techniques with some of the other Ariel builders during the course of this project, but I have to give credit to my friend, Sam Matoba, for cutting the wood for this project. I think Sam cut enough wood for six or seven pairs of Ariels, with all of the necessary dado and angle cuts. That's a lot of work!
Lynn, thanks for a great project!!"
George E. Cherhit
Sacramento, CAGeorge E. Cherhit is known as gcherht at the ns dot net site.
"After an off-and-on effort of 9 months I finally finished my Ariels. I'd like to share some ideas I used as cost cutting measures. I seem to get superb performance in spite of my cheapness!
First of all, I used the Vifas and ScanSpeak D2905/9000 as recommended. I built the cabinets from 3/4 MDF and Birch Plywood that I got from our local discount home supply warehouse. My base plinth is two layers of MDF sandwiched together for enough thickness to easily carpet spikes.
I lined the transmission line walls with 3 layers of 1/8 inch dense wool blanket material I got as a remnant from the fabric store. I had a hard time finding real wool carpet felt. I used the fancy audio long hair wool to fill the straight portions of the transmission lines.
All of what has been described pretty much follows the suggested construction. The differences are as follows:
For those who cringe at the prices paid for super high tech dampening materials I have found a cheap solution. As discussed in the "Panel Damping and Sound Absorbers" you need to dampen the vibrations on the center divider panel and some acoustical energy of the Vifa drivers. I approached this by trying to deal with these problems seperately. To dampen the center divider, and the angled back panel of the upper arm of the asymetric "Y" I used a layer constrained boundary techniqe. I offset the center cabinet divider forward by 3/8" inch and attached a 5/8" thick panel of Wonderboard to the back side using tile-to-wood mastic and 5 dry wall screws (1 at each of the 4 corners and 1 at the center). Wonderboard is really just a slab of concrete with nylon mesh embedded on the surface of each side used as underlayment for tile. I also routered the corners of the wedge braces with a 3/8" radius rounding bit to compensate for the extra panel thickness.
To dampen the Vifa drivers I recruited my more experienced sibling. He stuffed a handfull sized wad of dacron fiber fill I pulled out of an old pillow over top of a handfull sized wad of ichy pink fiberglass insulation used for home construction and stuffed it behind each driver. By over top I really mean that the dacron was placed on top of the fiberglass so the transmission line was half blocked by the dacron and half by fiberglass. The theory is that the dacron will dampen and control while the fiberglass will not allow the throat of the transmission line to be choked by the dacron thus retaining its wonderfully dynamic bass.
On the crossover I took the poor man's approach. I used perfect-lay air core inductors and Bennic capacitors from Madisound for all and bypassed the 4.7uF tweeter cap with a 2uF MIT film and foil Multicap. I had to reshape the tweeter response a little since the one I have seems to vary somewhat from the factory spec :-)
Overall results were excellent. Coherent controlled response with excellent clarity, resolution and unconstrained dynamics. I drive my Ariels with a home built singled ended amplifier 3 - 2A3's per channel using the UBT-1 output transformer for a grand total of 12 watts per channel."
Thanks for your assistance and a wonderful speaker design,
BretBret Strain is known as brets at the hpsrjtc.sr.hp.com Website.
Benny Priady is known as bpriady at the ibm dot net site.
Randolph Fay is known as rfay at the mail.wincom.net Website.
David Amerson is known as ammo at the ix.netcom.com Website.
Todd McLaughlin is known as toddm at the rahul dot net site.
Michael Mah is known as moe111 at the mail.softcom.net Website.
Sam Nickerson is known as samn at the bellsouth dot net site.
Tim Shannon is known as tymzym at the apc dot net site.
Summer Evening In Oregon
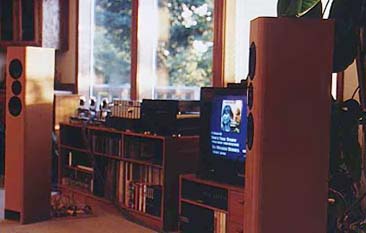
A late-summer sunset in the Northwest gives our living room a pleasant glow. This picture, taken in 1998, combines 300B triode power with 2 sources: a Monarchy Laserdisk player and low-jitter CD transport, and a Sony DVP-S500D DVD player. Both S/PDIF sources drive the Resolution Audio Quantum DAC, Jeff Rowland preamp, PP 300B amplifiers of my own design, a 1985-vintage NEC NTSC 25" television, and the Ariels. The loose collection of parts directly behind the left speaker is the crossover mounted on a 1 by 2 foot piece of perf-board. The TV is showing a still-picture that accompanies the sound of the Chesky 96/24 sampler DVD. If you look closely at the TV picture, you can see which track was playing when I took the photo.
In stereo or surround, the Ariels and ME2's really thrive on vacuum-tube power. With many transistor amps, they can sound flat and undynamic, with a recessed midrange. In fact, all of the sonic complaints about the Ariels and ME2's have come from transistor-amp owners ... the triode folks are very happy. If you're adventurous enough to build an all-tube 5-channel system, you don't need to go to the extreme of 5-channels of triode amplification. The rear channels will be perfectly happy with a vintage EL84/6BQ5 PP amplifier, and for the Center speaker, you can choose either a vintage mono low-powered amplifier, or use a single monoblock triode amplifier.
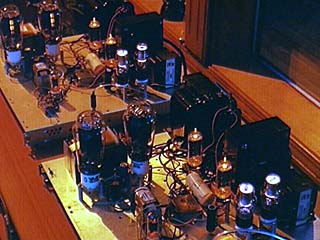
The signal path of each PP amplifier is right-to-left and comprises a Lundahl input transformer, 5687, 7044, 7119 or JJ ECC99 PP driver, Lundahl interstage, PP VV32B's, and Lundahl output transformer. Visit the Triode Electronics page for more information on how the Amity was designed.
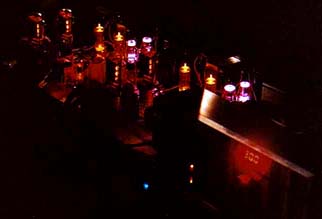
Moonlight reflecting off the top of the Rowland preamp and the colorful glow of 7119 driver tubes, OC3 shunt-regulator VR tubes for the 7119 drivers, 6CJ3 TV damper diodes for the main B+ supply, and a matched pair of KR Labs KR32B direct-heated triodes. There are no resistors or capacitors in the signal path; all coupling is thanks to Lundahl transformers, which give a bandwidth of 15 Hz to 75kHz at full power (20 watts/channel). The new Aurora power amps will have all-copper chassis and built-in DACT volume controls and selector switches, removing the need for an external preamp.
Index
